Deploying & Configuring Server 2012 R2 Essentials with Office 365
Intro
This article will see us use Server 2012 R2 Essentials to integrate with Office 365 for Exchange. This will be one of the options I’ll discuss during my session titled “Exploring options for moving a small Exchange or Small Business Server environment to Office 365 or remaining on-premises” at Exchange Connections 2014 in Las Vegas Sept 15th-19th. It’s a long title for a session but it’s fitting considering the many options you’ll have for you or your customer’s business.
First we should know what Server 2012 R2 Essentials is. You could say it’s the spiritual successor to Small Business Server 2011, which was essentially (pun intended) discontinued. For a detailed walkthrough of Windows Server 2012 R2 Essentials, watch this great multi-part video series on it from Microsoft. It’ll answer all your licensing, deployment, & configuration questions.
History & Now
The last version of Small Business Server was SBS 2011. This was a Server 2008 R2 Domain Controller which ran Exchange 2010, along with WSUS, File Services, SharePoint Foundation, & SQL. The solution had several other cool features like Remote Web Workplace which was a web portal (running on top of Remote Desktop Services) that allowed any remote user to connect through a web interface & remote into a client machine on the company LAN. It also included a singular management interface named the SBS Console where Admins could manage Users, Groups, Mailboxes, Backups, Alerts, & Updates. This solution was aimed at small businesses (as the name implied) with less than 75 users.
Fast forward to today & we have Server 2012 R2 Essentials which has new features but also is a bit lighter. Exchange, SharePoint, & SQL are no longer included with the product; however you can still utilize these applications either on-premises (on another server) or in the cloud. The Windows Server Essentials Dashboard allows you to perform many of the same user management functions as the SBS Console, as well as manage mailboxes if you’ve chosen to run Exchange on another server on-premises or have connected your server to Office 365 (more on that later). New with 2012 R2 is the ability to install Essentials as a Server Role on Server 2012 R2 Standard or Datacenter; this is called the Windows Server Essentials Experience Role. See the aforementioned video series to learn about all the additional features of 2012 R2 Essentials.
Our Goal
In this article I’ll be Installing the Windows Server Essentials Experience Role, configuring the environment as if I were a small business, & connecting my environment to an Office 365 Tenant. I chose to use the server role (instead of a full Essentials OS install) in this guide for my own convenience. The experience should be the same, it’s really just the licensing that differs. Once we’ve performed these steps we’ll explore management of users; most notably, managing Office 365 mailboxes from the Essentials Dashboard. We’ll also see how passwords are synched to O365 (yes that’s right, Essentials had PasswordSync before the full version of DirSync did!).
Adding the Windows Server Essentials Experience Server Role
- Launch Server Manager, select Local Server, select Manage, & click Add Roles and Features.
- Proceed to the Select Server Roles page & place a checkmark next to Windows Server Essentials Experience. Take note of the additional Features that will be installed. Select Add Features & click Next a few times & then click Install. Reboot afterwards.

Exploring & Configuring Essentials
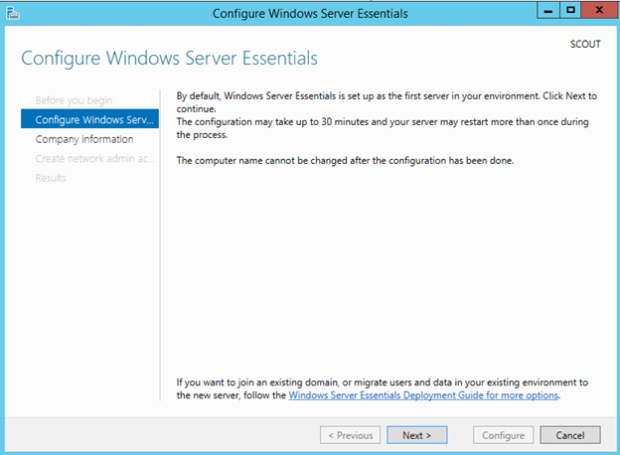
- Upon logging back into the server post-reboot, open Server Manager & click the flag in the top-right corner of the screen indicating post-deployment tasks requiring action. Click Configure Windows Server Essentials
- Take note of the initial page & click Next.
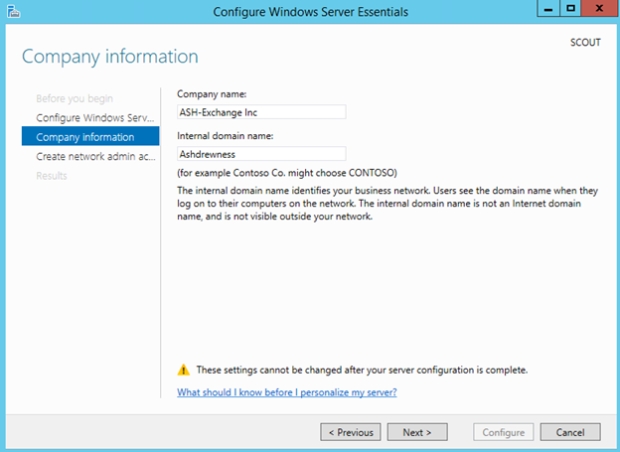
- As part of the Role configuration, your server will be made into a Domain Controller of a new Active Directory Domain (if you do not already have a domain). In this case I’ll put “ASH-Exchange Inc” for my Company Name (a fake Company Name I chose in hopes of not being sued 😉 ). I’ll also put “Ashdrewness” as the Internal Domain Name (I own ashdrewness.com; replace that domain in this guide with a domain you own). Click Next.
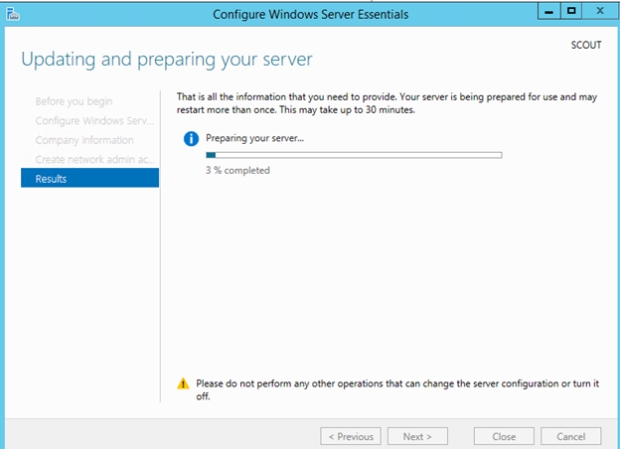
- When asked for an Administrator account I put “Andrew-Admin” & entered my preferred password twice. Click Configure. This next phase may take up to 30min, feel free to grab your favorite beverage. The server will eventually reboot.
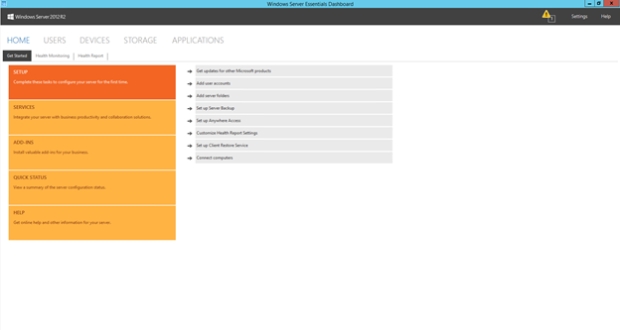
- After the server has rebooted you can log back in with the account you were using to perform the install/configuration (Administrator in my case) or the account you just created. After opening Server Manager you’ll be greeted with a dialog box saying the configuration is complete. Click Close.

- My server is now a Domain Controller for the Ashdrewness.local domain. From the Desktop, click the icon for the “Dashboard.” You’ll be greeted by the Essentials Dashboard.
- I’ll go ahead & create some test user accounts by clicking on “Add user accounts” & then clicking “Click to add user accounts”.
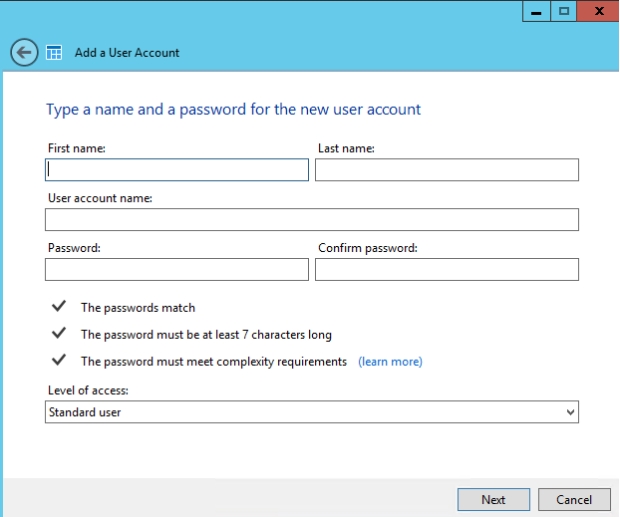
- Here I’ll create an account named John Smith with a “User account name” of JohnSmith. I’ll create a password, make the user a Standard user & click Next. On the shared folder screen click Next. On the Enable Anywhere Access screen click “Create account”. I’ll repeat this process for users Sally Smith & Mike Smith.


Configuring Office 365 Integration
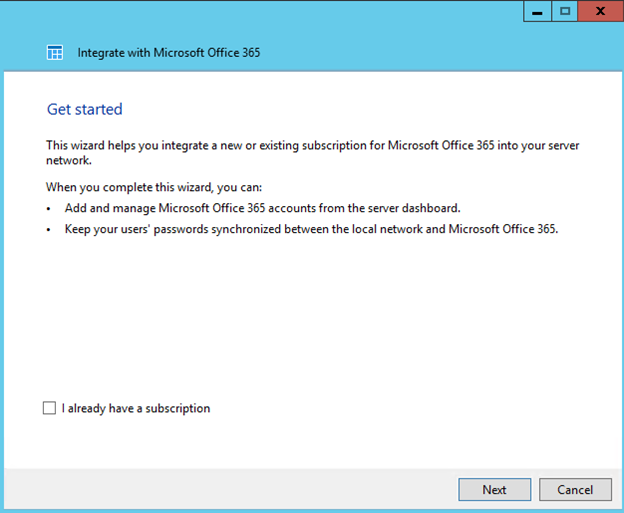
- Now at this point there are many things I could setup on the server from within this wizard such as Backup, Anywhere Access, & adding computers to the domain; but for now I’ll just go straight to the “Services” section of the Dashboard.
- With “Services” selected, click “Integrate with Office 365.” Then click “Integrate with Office 365” again. This wizard will help us setup integration with an Office 365 tenant. You can either have a tenant already created or you can use the wizard to create one (or create a trial tenant). We’ll use the wizard to create our tenant now.

- Click Next & then click “Try” under “Microsoft Office 365 for midsize business and enterprises”. On the page it takes you to, input the requested information. On the next page I’ll create a username of “Andrew” & put “ashdrewnesstrial” as my company name. After creating a password click Next. You may be asked to provide a phone number for text message verification to prove that you’re not a bot. Afterwards click “Create my account.”
- Afterwards you’ll be given some information to write down, similar to :
Office 365 sign-in page:
Your Office 365 user ID:
andrew@ashdrewnesstrial.onmicrosoft.com
- Click on “You’re ready to go” to be taken to the main dashboard of your Office 365 tenant. (Note: as time goes on, some of these O365 menu options may change so please use your best judgment to get through them. Also, If your browser crashes or you need to get back to the O365 Admin portal then just login to https://portal.office.com using the account you just created; andrew@ashdrewnesstrial.onmicrosoft.com in my case.)
- From the top of the Dashboard click Admin>Office 365. On the next page click “Domains”. Click “Add Domain”.
- I own “ashdrewness.com” so at this point I’ll add it to this Office 365 tenant (Note: a domain can only exist in one Office 365 tenant at a time). Use this wizard to add your domain. In my case the domain is hosted by GoDaddy so I’m prompted to have the Office 365 wizard confirm ownership for me by creating a randomly generated TXT record. I will be prompted for my GoDaddy credentials & the required records will be created for me. Click Finish when complete.
- At this point of the wizard I’ll be asked to add users & assign licenses. Click “Start step 2” & say “I don’t want to add users right now” & then Next.
- Click “Start step 3” & then click Next to say I wish to use this domain for Exchange & Lync Online.
- Now click “Setup records” to add the appropriate DNS records in your zone. Click Finish.
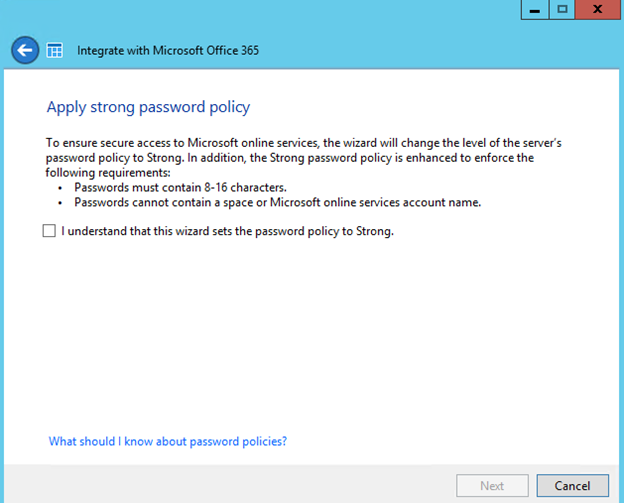
- [Back in Essentials] At this point, go back to the “Integrate with Microsoft Office 365” wizard in the Essentials Dashboard. If you’re still on the page where we left off then click Next.
- Enter the credentials for the Office 365 admin account we created; in my case this will be Andrew@ashdrewnesstrial.onmicrosoft.com. Click Next after entering the credentials.
- The next page will inform you that a strong password policy will be configured. Check the box & click Next (by doing this, users may be prompted to change their passwords).


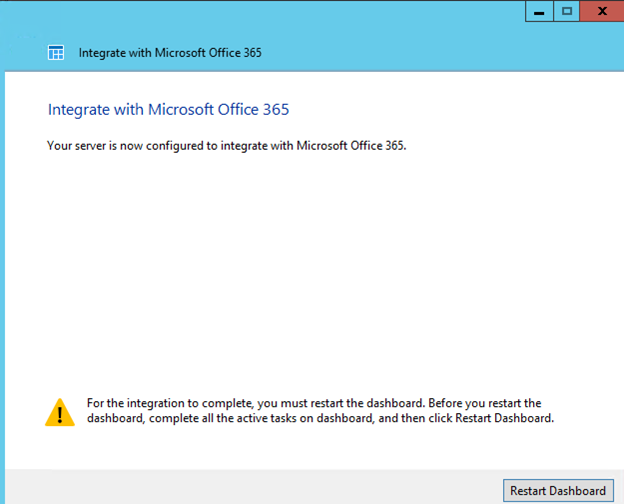
- After completing the wizard & restarting the Dashboard, click on “Services” again to see that your Windows Azure Active Directory & Office 365 integrations are now Enabled.
Matching your Active Directory Users with an Office 365 Mailbox
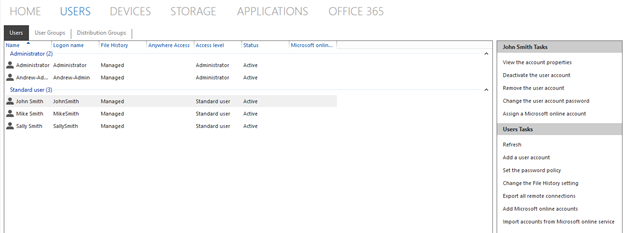
- Click on “Users” within the Essentials Dashboard & then select John Smith. In the right-hand pane click “Assign a Microsoft online account”

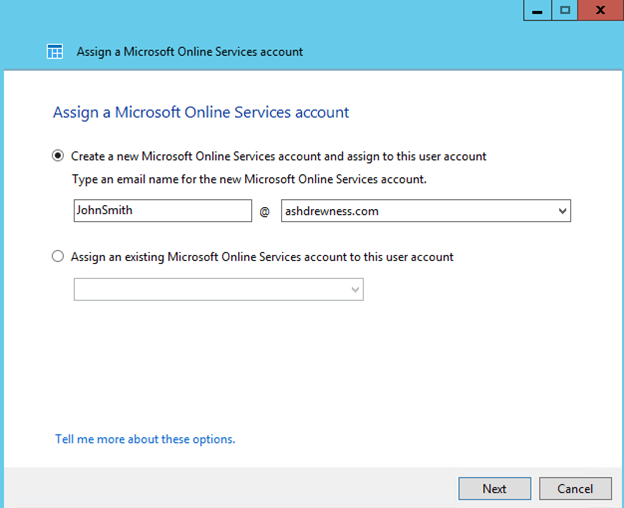
- On the first page of the wizard, leave the default selection of “Create a new Microsoft Online Services account & assign to this user account”. Click Next

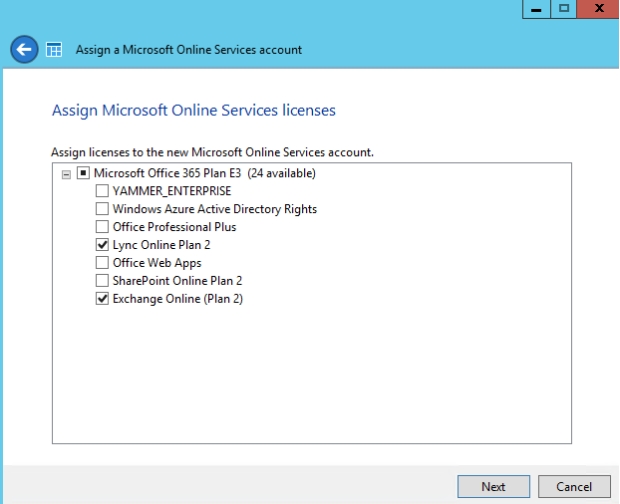
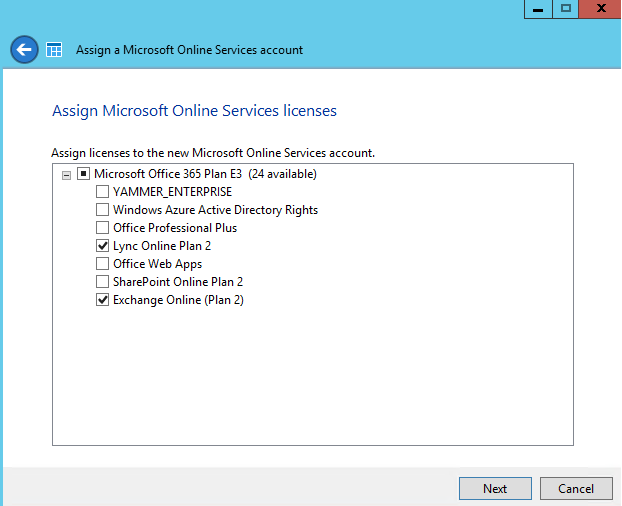
- On the next page, at this time just select Exchange & Lync (while I’m sure all your users will be anxious to start using Yammer, they can be patient). Click Next.
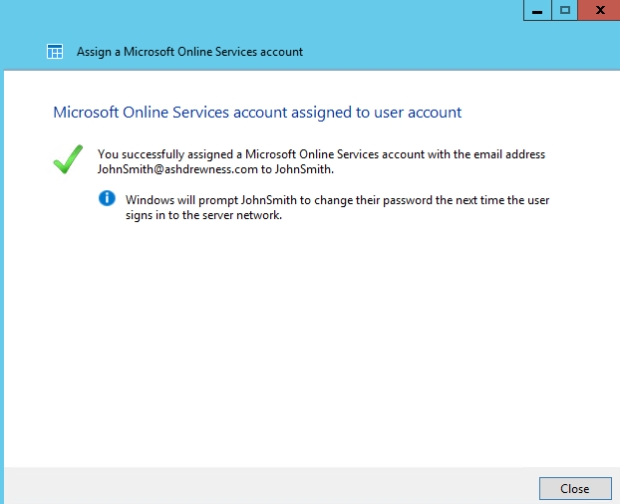
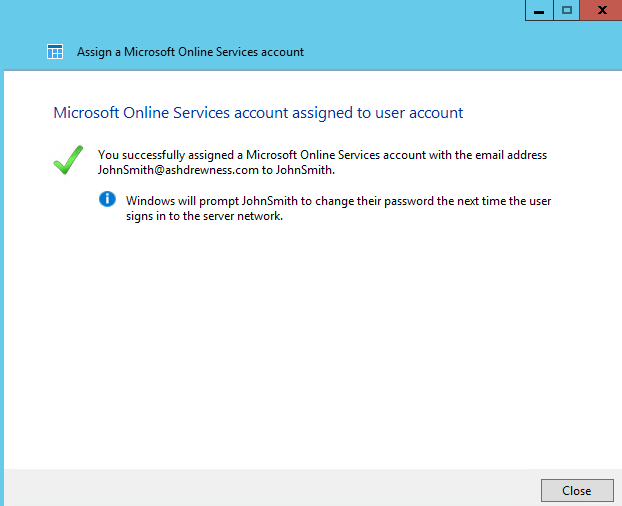
- The next page should provide verification that the account has been created & will also notify you that John Smith will be prompted to change his credentials the next time he signs in. Click Close.
- At this point if I look at the user account of John Smith in Active Directory I can see that his User Principal name has been changed from JohnSmith@ashdrewness.local to JohnSmith@ashdrewness.com. Also, if I open the Office 365 Admin Center I’ll see that John Smith has been added to the tenant with a Status of “in cloud” which is different than it would show up if it were synched from my local Active Directory using DirSync. This is because Essentials does not use DirSync but its own custom framework for synching users to the cloud & keeping Passwords in sync (in fact, it could do Password Synchronization before DirSync could). Speaking of passwords…..
- Now if you were to try & login to the Office 365 portal right now as JohnSmith@Ashdrewness.com you would get a login error. What you must first do is either try to login to your local Active Directory environment, have it prompt you to change your credentials, change them to a password that meets your new complexity policy OR an admin could use the Essentials Dashboard or Active Directory Users & Computers to reset the password.
- Afterwards, connect to https://portal.office.com & login using JohnSmith@Ashdrewness.com with your new credentials. You’ll be presented with the below page. Note: In my testing, it is a matter of seconds between changing a password on-premises & having it take effect in the Office 365 tenant. This is much faster than DirSync; however using the Essentials Office 365 features (and its own custom web-based sync service) is only supported in a single Domain Controller environment, aka small environments (UPDATE: It is now supported in multi-DC environments per this article).
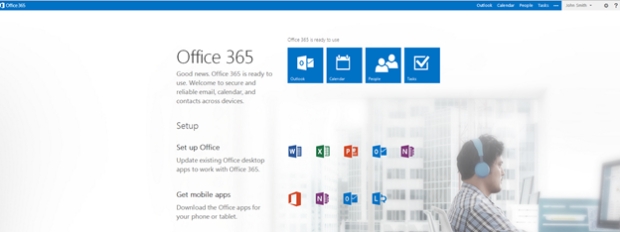

- You will now be able to use Office 365 features like Exchange Online.

Map an existing On-Premises user account to an existing Office 365 mailbox
We’ll now act as if we already have an Office 365 mailbox created & now we wish to map it to an on-prem AD user account. For instance, this would be the case if you had migrated from another version of Exchange to Office 365 using a Cutover Migration or similar.
- Login to the Office 365 admin portal with Andrew@ashdrewnesstrial.onmicrosoft.com & navigate to “Users and groups”. Click the plus symbol to create a new user called “Mike Smith” with a user name of “MikeSmith”.
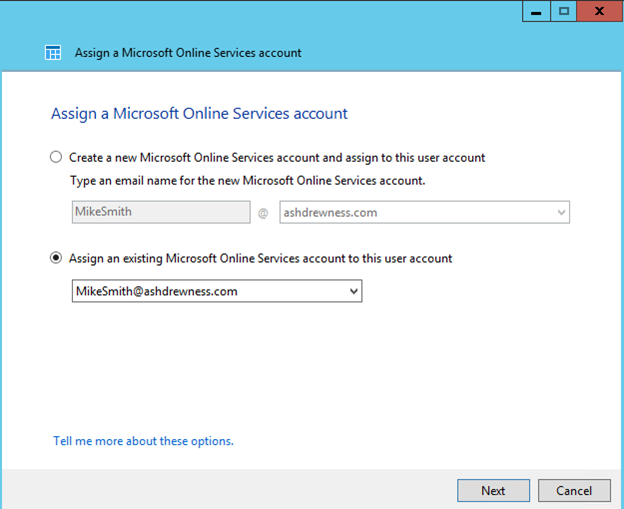
- Now back in the Essentials Dashboard, select Mike Smith & then click “Assign a Microsoft online account.”
- This time select “Assign an existing Microsoft Online Services account to this user’s account”. Notice how a drop-down will appear which will automatically populate with your tenant accounts which have yet to be mapped to an on-prem user account. Select MikeSmith@ashdrewness.com & click Next.

Managing your Office 365 properties from the Essentials Dashboard
- From the Users pane of the Essentials Dashboard, double-click John Smith’s user account. On the Properties of John’s account, click the “Microsoft online” tab. Notice it’ll take a second to connect.
- Notice you can do things like block access to the service, add additional email addresses, & assign/un-assign services to the account. Close out of the Properties of John’s account.
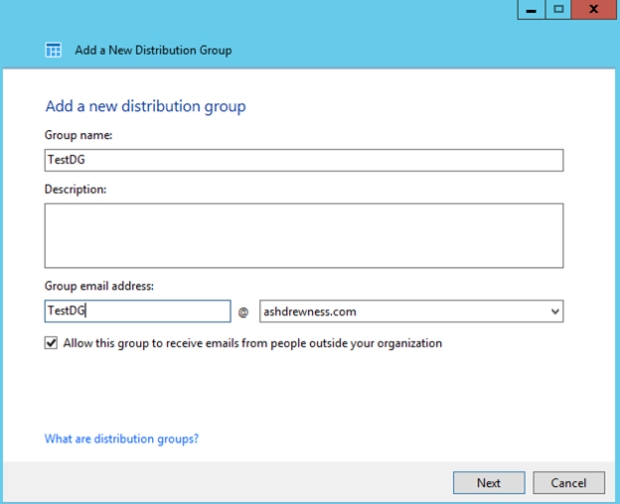
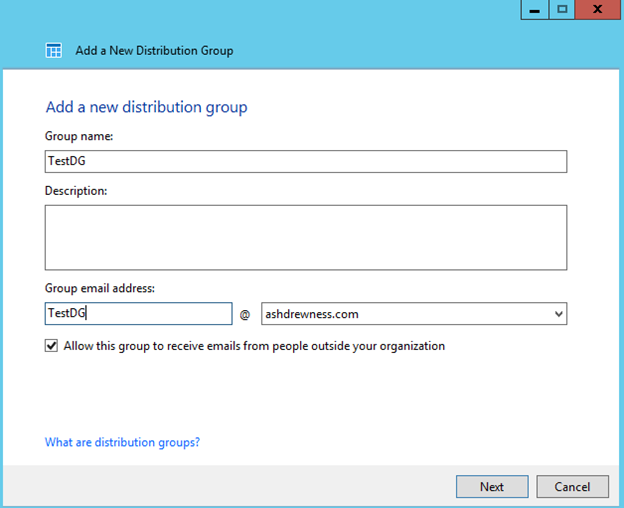
- Within the Users pane of the Essentials Dashboard, click the Distribution Groups tab & then click “Add a distribution group”.
- Create a group called “TestDG” & give it an email address of TestDB@ashdrewness.com & click Next.
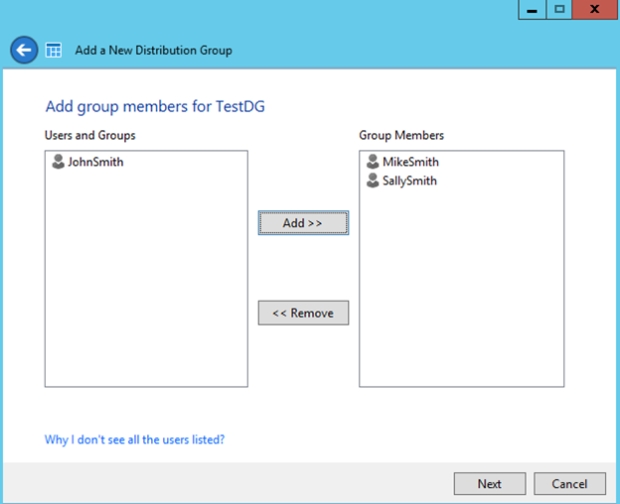
- Add Mike & Sally to TestDG & click Next. The group will be created in your Office 365 tenant.
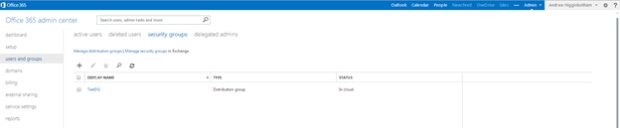
- If you login to your tenant you will now see that the group has been added with the users you selected as members.


Summary
Hopefully this gives you an idea of what’s possible with Server 2012 R2 Essentials & can be looked at as a viable option for you or your customers.
Again, I’ll be speaking at Exchange Connections 2014 in Las Vegas Sept 15th-19th on the topic of small businesses & Office 365, as well as Exchange troubleshooting. I hope to see you there!
Edit: The Office 365 Integration features are now supported in multiple Domain Controller environments. It now appears that the only limit is the 100 user supported limit mentioned in this article

